Getting Familiar with the User Interface
Contents
Getting Familiar with the User Interface
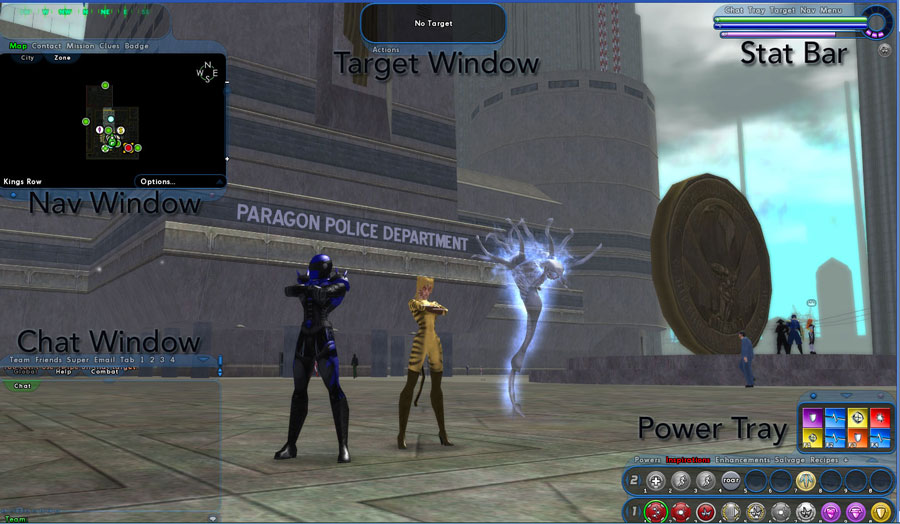
Stat Bar
Monitoring your status in combat is crucial to your survival no matter who you find yourself battling with. In your screen's top right corner are three colored horizontal bars (green, blue, and purple) followed by an equally partitioned circle.
Green designates Hit Points, blue your Endurance, and purple is the amount of Experience you've accrued toward the next partition in the circle—when all partitions in the circle are full, you gain a level.
When the entire length of each bar is filled with its corresponding color, you are at maximum capacity (i.e., fully healed, etc.) for those stats. If you're not at maximum, your current status is represented by the amount of colored area in proportion to the entire length of the bar.
To see an exact numerical representation of a stat, simply hover your mouse cursor over one of these bars. In addition, specific archetypes might have a bar that measures the level of their special ability.
Stat Bar Elements
- Hit Point Bar: Your current Hit Points are displayed by the green status bar—this is your health and signifies how much damage you can take before being defeated in battle. Although the bar's length never increases in size, the numerical number of your total Hit Points increases with every new level you reach.
- Endurance Bar: The blue bar in the middle signifies the current amount of Endurance (100 total) that you have available for the use of your powers.
- Experience Bar: The purple bar indicates your Experience gain toward your next tenth of a level. The partitioned circle to the right of the status bars indicates total experience required for the next level. There are 10 partitions (often called "bubbles" or "bubs"); each fills one at a time as the purple status bar reaches maximum. When the circle is completely filled with purple, you gain a level.
- XP Debt: Beginning at Level 10, you start accruing Experience (XP) Debt when you are defeated in battle. A dark purple shaded area leading the lighter purple portion of your Experience Bar designates this debt. In cases of extreme debt, this dark shaded area spreads to the bubbles in the circle as well. Hover your cursor over the Experience bar to reveal the exact amount of debt you have acquired.
While in debt, the amount of Experience you earn is divided approximately half goes toward your next level, and the other half goes toward paying off your debt. Your leveling speed is halved while you are in debt.
The amount of debt you acquire varies with your level at the time you are defeated. Becoming an Exemplar or Malefactor to another hero or villain that has a lower level than you accelerates your debt repayment.
Targeting
You must select a target before making any offensive action. Even most area effect powers that damage groups of targets usually require a central target selection.
To acquire a target, simply leftclick on an enemy you want to attack or press the Tab button to cycle through targets, beginning with the one closest to you. Selected targets have orange brackets surrounding them, accompanied by the name and status bars over their heads.
You can also open a Target Window from the Menu tab to view the same information just described; a target's level, group affiliation, and rank also appear in a separate window.
If an ally is targeted, the Target Window shows his or her Super Group affiliation (if any), Origin, and Archetype. Targeting allies allows you to buff or heal; targeting contacts initiates dialogue options if you are close enough; and targeting NPCs allows you to buy or sell items from them and train up after leveling if you are close enough.
Color Coding
When you target an enemy, their name will display over their heads in specific colors that tell you their power level in comparison to yours (see the following color list).
Learn to distinguish what these colors mean—it helps you determine if this is a battle you can win should you choose to attack.
- Gray: Significantly less powerful than you. No contest.
- Green: Substantially less powerful than you. Should be easy. You will hit these easily and receive far less XP than normal for defeating.
- Blue: Less powerful than you. Can be dangerous in groups or to non-combat oriented characters. You hit these easily and receive less XP than normal.
- White: Equal power level to your own. Depending on your Archetype and powers, you may be able to handle several of these at once, or you may find a single enemy a challenge. You will hit these normally and receive normal XP for this.
- Yellow: A bit higher level than you. Combat-oriented characters should take care when engaging alone, avoiding them when they're in large groups. You will hit these less often and receive more XP than normal for defeating.
- Orange: Substantially higher in power than you. Only villains skilled in combat should attempt to engage solo, and then only with extreme caution. You will hit these even less often and receive yet more XP than normal for defeating.
- Red: Significantly higher than your power level. Should not be engaged one-on-one. You will hit these even less often and receive yet more XP than normal for defeating.
- Purple: Far ahead of your power level. Do not engage one-on-one. Purples near your level may be successfully engaged in groups. You will hit these very infrequently but will receive far more XP than normal for defeating.
Taking Damage and Restoring Health
Your lost Hit Points replenish at a slow, steady rate. There are powers that improve this natural healing rate, and there are healing powers and healing Inspirations to rapidly recover Hit Points.
When you have no Hit Points left, you are considered defeated and are unable to continue fighting or take many other actions (you can still converse and trade with other players, which is useful for trading Restoration Inspirations with an ally).
When defeated, you are unable to restore Hit Points with heals or healing Inspirations; you must either be revived by an ally, use a Restoration Inspiration yourself, or be transferred to the nearest hospital for recovery.
Damage Displays in Combat
When you are in combat, the game shows you how much damage you are dealing to the enemy, how much damage you are taking, and how much damage you are recovering from. These numbers appear over the head of each affected character; damage is indicated by a color-coded negative number (see following list) and healing by a positive number in green.
- Orange: Damage inflicted by you on an enemy
- Red: Damage inflicted upon you
- Green: Healing applied to your villain, or healing bestowed by your villain on an ally
- Gray: Damage or healing inflicted by another character on another character
There are different types of damage that are dealt in the game, and each can be resisted by you or your enemies, depending on damage resistant attributes that will count toward diminishing the total damage taken.
When an attack deals more than one type of damage, multiple numbers appear over a target's head as the attack hits them; this shows that the types of damage are being tracked separately.
By observing these numbers, you know precisely what kind of abuse you're taking and what you must potentially do to counter it.
Power Tray
The Power Tray appears as 10 numbered circles in a line. Access the Power Window by clicking on "Powers" located on the Power Tray.
From the Power Window, drag additional icons to empty slots on the Power Tray. To clear a slot on the Power Tray, right-click the button and select "delete power."
There are a total of nine separate Power Trays; toggle them by pressing the left or right arrows located on the left-hand side of the line of circles.
Clicking the arrow key located on top of the Power Tray reveals up to two additional Power Trays. Click the arrow key again to collapse the Power Tray back to one line.
Pressing a button on the Power Tray activates that power (if possible) and initiates a recharge timer. This recharge period is designated by a shrunken and grayed icon that scales back to full size as the recharge is complete. You can also use the number keys 1 through 0 on your keyboard to activate the power in the corresponding slot.
If a second tray is visible on-screen, the corresponding slots on the upper tray are mapped to Alt 1 through Alt 0. If there is a third Power Tray, the top slots are mapped to Control 1 through Control 0. You can remap all of these keys in your Options/Controls menu.
Your tray contains two types of powers—those that you must execute individually for each attack or effect (known as "Click Powers") and those known as "Toggle Powers." This simply means that you turn those powers on and off by clicking on them or striking the respective key that the power is assigned.
Toggle Powers can drain Endurance in large amounts, depending on the power in question, so carefully watch those that are sapping you at inopportune times.
There is a third type of power, known as "Auto Power." These are always on and do not drain any Endurance (they also do not appear in your Power Tray).
Aside from your powers, the Power Tray also holds special key bindings (macros) that perform a combination of actions created by the player. These macros have an icon, which you can then drag to the Power Tray from the Power Window.
